Yii2 framework are growing rapidly for MVC based php application in these days. We can create and manage the code and design part separatly in Yii2 also as we do in Wordpress, Joomla or Drupal - popular open source for php application. Here are steps for theme integration in Yii2.
Yii2 theme integration in advance template or how to set theme in Yii2
Please follow the steps below to integrate or configure the theme into Yii 2 or Yii 2 theming. Using these steps one can easily display or customize the output of Yii 2 application by applying the new theme.
"SB Admin - Free Bootstrap Admin Template" theme(free downloadable is available, just googling it) has been used by us for our application and also in the code below. It is very nice admin template or theme that can be managed easily with Yii 2 theming or templating using advance application template.
- Creating Theme folder
- Adding Theme Assets files (css, js etc.) into Yii engine
- Registering Theme Assets files (css, js etc.) into Yii engine
- Registering and creating themed version of the view file Views
- Applying downloaded theme HTML into Yii2 layout file
1. Creating Theme folder - for Yii2 custom layout
Create the ‘themes’ directory in web folder in backend. Create and give a name to the custom theme folder in the "themes(backend/web/themes/)" folder. Here we will use "abcrealestate" as custom theme name. Now, open the downloaded HTML template(SB Admin) folder as shown in the below screenshot.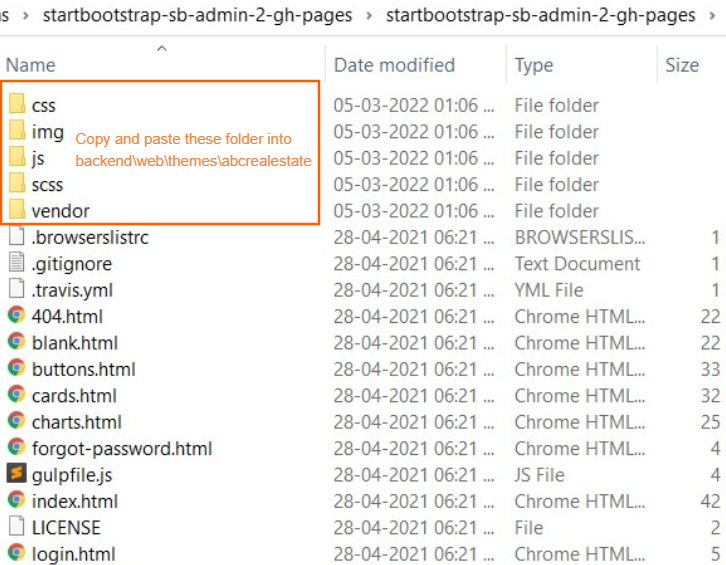
Copy and paste the assets files - css, js, images etc. in the ‘abcrealestate’ folder. File path and structure has been shown below -
Path – backend/web/themes/abcrealestate
Structure -
backend/web/themes/abcrealestate
backend/web/themes/abcrealestate/css
backend/web/themes/abcrealestate/js
backend/web/themes/abcrealestate/scss
backend/web/themes/abcrealestate/img
backend/web/themes/abcrealestate/vendor
NOTE – “abcrealestate” is our theme folder name.
2. Adding Theme Assets files (css, js etc.) into Yii engine
An asset in Yii is a file that may be referenced in a Web page. It can be a CSS file, a JavaScript file, an image or video file, etc. Assets are located in Web-accessible directories and are directly served by Web servers.2a. Yii2 asset manager example -
An asset bundle class is called autoloadable. It usually specifies where the assets are located, what CSS and JavaScript files the bundle contains, and how the bundle depends on other bundles.Asset bundles are specified as PHP classes extending from 'yii\web\AssetBundle'. Below are the sample code for AppAsset class.
namespace app\assets;
use yii\web\AssetBundle;
class AppAsset extends AssetBundle
{
    public $basePath = '@webroot';
    public $baseUrl = '@web';
    public $css = [
        'css/site.css',
        ['css/print.css', 'media' => 'print'],
    ];
    public $js = [
    ];
    public $depends = [
        'yii\web\YiiAsset',
        'yii\bootstrap\BootstrapAsset',
    ];
}
Now, copy file – AppAsset.php = “backend/assets/AppAsset.php” and rename this file as you want. In our case we renamed it, using theme prefix e.g AbcrealestateAsset.php
Path – backend/assets/AbcrealestateAsset.php
Change or update $css and $js variables in AbcrealestateAsset.php file. We will write our new theme css and js file path in the $css and $js variable so the Yii2 asset manager engine recognize and initiate it into Yii2 engine.
2b. Changing or updating $css variable
For this you need to open the downloaded HTML template(SB Admin) "index.html" file in the HTML editor and verify the css files path used in the HTML template header position. The "SB Admin" template uses three css files which can be viewed in the below screenshot -
We will add all three css path in the "AbcrealestateAsset.php" file.
2c. Changing or updating $js variable
For this you need to open the downloaded HTML template(SB Admin) "index.html" file in the HTML editor and verify the js files path used in the HTML template footer position. The "SB Admin" template uses seven js files which can be viewed in the below screenshot -
Below is the modified code for "AbcrealestateAsset.php" as per available assets(css, js etc.) in the downloaded HTML template(SB Admin) -
namespace app\assets;
use yii\web\AssetBundle;
class AbcrealestateAsset extends AssetBundle
{
    public $basePath = '@webroot';
    public $baseUrl = '@web';
	public $css = [
    //'css/site.css',
    'themes/abcrealestate/vendor/fontawesome-free/css/all.min.css',
    '//fonts.googleapis.com/css?family=Nunito:200,200i,300,300i,400,400i,600,600i,700,700i,800,800i,900,900i',
    'themes/abcrealestate/css/sb-admin-2.min.css',
   ];
	public $js = [
        'themes/abcrealestate/vendor/jquery/jquery.min.js',
        'themes/abcrealestate/vendor/bootstrap/js/bootstrap.bundle.min.js',
        'themes/abcrealestate/vendor/jquery-easing/jquery.easing.min.js',
        'themes/abcrealestate/js/sb-admin-2.min.js',
        'themes/abcrealestate/vendor/chart.js/Chart.min.js',
        'themes/abcrealestate/js/demo/chart-area-demo.js',
        'themes/abcrealestate/js/demo/chart-pie-demo.js',
     ];
    public $depends = [
        'yii\web\YiiAsset',
        'yii\bootstrap\BootstrapAsset',
    ];
}
NOTE – Do not include core bootstrap css, bootstrap js and jquery js as these are core APIs that are provided by Yii2. Just please comment it.
2d. REMOVING default bootstrap css and js
Please add below code into "backend/config/main.php" in the components array config parameter -return [
// ...
'components' => [
//REMOVING default bootstrap css and js starts
'assetManager' => [
'bundles' => [
'yii\web\JqueryAsset' => [
'js'=>[]
],
'yii\bootstrap\BootstrapPluginAsset' => [
'js'=>[]
],
'yii\bootstrap\BootstrapAsset' => [
'css' => [],
],
],
],
//REMOVING default bootstrap css and js ends
];
Below is the snapshot of the "backend/config/main.php" after code addition -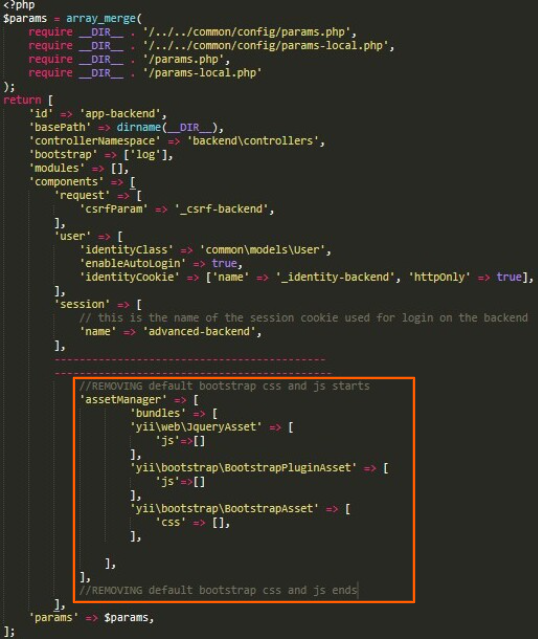
3. Registering and importing the newly created theme Assets files (css, js etc.) into Yii engine
First, you need to copy the "views" folder of default Yii2 application which resides at the path - "yii2project/backend/views/" in the newly created theme folder path - "backend/web/themes/abcrealestate/". The default "views" folder coantains two sub folders - "layouts" and "site" which are used for layouting and site pages display in the Yii2 application. Now register your new assets into Yii2 engine. Please go at Yii2 layout file –backend/web/themes/abcrealestate/views/layouts/main.php
Comment the code – "use backend\assets\AppAsset;" and use or add newly added our assets files path as below –
//use backend\assets\AppAsset;
use backend\assets\AbcrealestateAsset;
Now comment the code "AppAsset::register($this);" and add the code - "AbcrealestateAsset::register($this);" for your newly added theme(abcrealestate) assets files path registration into YII2 –
//AppAsset::register($this);
AbcrealestateAsset::register($this);
Below is the snapshot for above codes in the "backend/web/themes/abcrealestate/views/layouts/main.php" file -

4. Registering and initializing the newly created theme(abcrealestate) "Views" into Yii2 engine
Finally it is time to say or inform to Yii2 engine for our new theme(abcrealestate) based view files by adding the components array config parameter in main.php file. We will place the views path and details in the Yii2 configuration file "main.php" at below path -
Path – backend/config/main.php
When 'yii\base\View' renders a view file, it will check the active theme to see if there is a themed version of the view file exists. If so, the themed version will be rendered instead. Theme uses $pathMap to achieve the view file access as code below -
return [
// ...
'components' => [
    //Starts : For New theme - abcrealestate - hooking
    'view' => [
                  'theme' => [
                     'pathMap' => [
                        '@app/views' => [
                            '@webroot/themes/abcrealestate/views',
                         ]
                     ],
                   ],
                ],
    //Ends : For New theme - abcrealestate - hooking
];
Below is the snapshot for above codes in the "backend/config/main.php" file -

Further, we will create our custom or new views files in this "Views" folder. In this way we do the design and code separation in Yii2, as you know views represent the designing part of any application. Due to separation from code part, a designer can do his designing and outlining the application independently.
Views Path – backend/web/themes/abcrealestate/views
5. Applying downloaded theme HTML into Yii2 layout file
We will start applying HTML for - Main layout page, login page and signup page
5a. Main layout page
Yii2 framework main layout file path - backend/web/themes/abcrealestate/views/layouts/main.phpOpen the this main layout file in the PHP/HTML editor and remove everything in between <?php $this->beginBody() ?> and <?php $this->endBody() ?> as like below code -
<?php /** @var \yii\web\View $this */Below is the screenshot for the above code. We will place our template wrapper div in between - <?php $this->beginBody() ?> and <?php $this->endBody() ?> code.
/** @var string $content */ //use backend\assets\AppAsset;
use backend\assets\AbcrealestateAsset;
use common\widgets\Alert;
use yii\bootstrap4\Breadcrumbs;
use yii\bootstrap4\Html;
use yii\bootstrap4\Nav;
use yii\bootstrap4\NavBar; //AppAsset::register($this);
AbcrealestateAsset::register($this);
?>
<?php $this->beginPage() ?>
<!DOCTYPE html>
<html lang="<?= Yii::$app->language ?>" class="h-100">
<head>
<meta charset="<?= Yii::$app->charset ?>">
<meta name="viewport" content="width=device-width, initial-scale=1, shrink-to-fit=no">
<?php $this->registerCsrfMetaTags() ?>
<title><?= Html::encode($this->title) ?></title>
<?php $this->head() ?>
</head>
<body class="d-flex flex-column h-100">
<?php $this->beginBody() ?>
<?php $this->endBody() ?>
</body>
</html>
<?php $this->endPage();
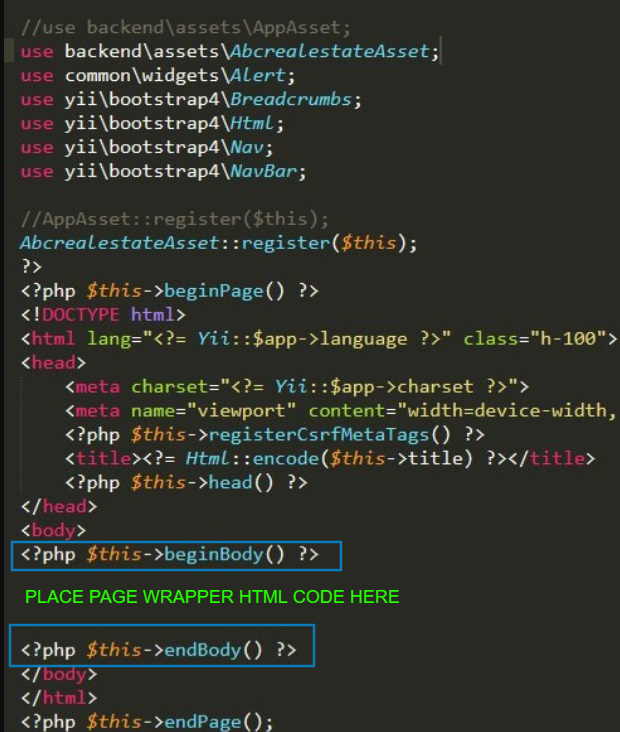
Now open the index file - "index.html" of the template "SB Admin" and find the page wrapper start and end div element. You can search below code in the "index.html" file. The wrapper div element screenshot has also been shown in the below. Please copy all the HTML code of the start and end wrapper div element and paste it in the MAIN layout file(backend/web/themes/abcrealestate/views/layouts/main.php) in between - <?php $this->beginBody() ?> and <?php $this->endBody() ?> code.
     <!-- Page Wrapper -->
     <div id="wrapper">
     --------------
     --------------
     --------------
     </div>
    <!-- End of Page Wrapper -->
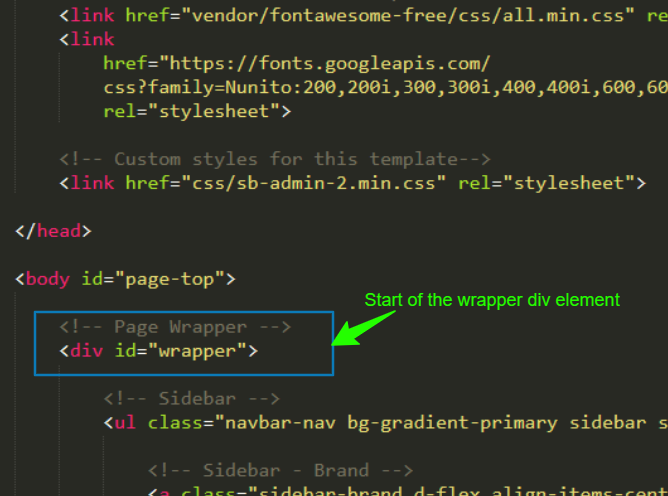
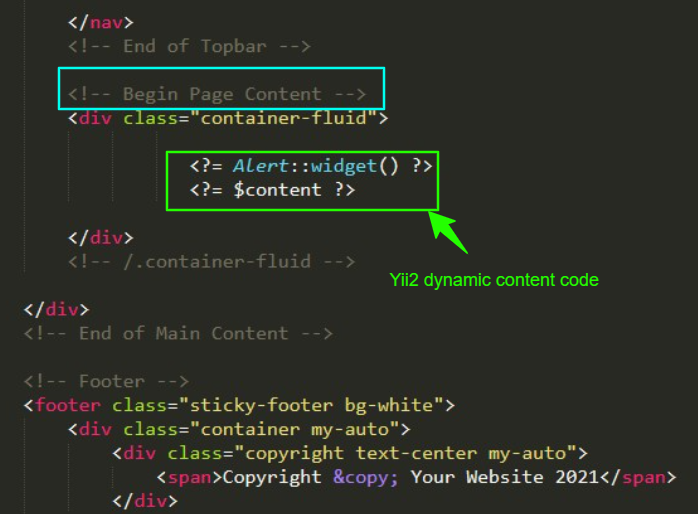
Now we will define the dynamic page content area in the main layout page. Please search the text - "Begin Page Content" in the existing layout page "backend/web/themes/abcrealestate/views/layouts/main.php". Delete everything or HTML code in between "<div class="container-fluid">" and "</div>".
Please write the Yii2 dynamic content code snippet - "<?= $content ?>" in between - "<div class="container-fluid">" and "</div>". Both Yii2 dynamic content code with HTML code has been shown below, as code sample and screenshot -
-----------
-----------
</nav>
<!-- End of Topbar -->
<!-- Begin Page Content -->
<div class="container-fluid">
<?= Alert::widget() ?>
<?= $content ?>
</div>
<!-- /.container-fluid -->
</div>
<!-- End of Main Content -->
<!-- Footer -->
<footer class="sticky-footer bg-white">
-----------
-----------
Now, we will correct and apply image file path using the Yii2 HTML helpers. For image path we will use following Yii2 HTML helper image code snippet in the existing layout page "backend/web/themes/abcrealestate/views/layouts/main.php" -
--------- ---------- ---------- <a class="dropdown-item d-flex align-items-center" href="#">Next, we will correct and apply anchor or link url using the Yii2 HTML helpers for sidebar navigation. For anchor url we will use following Yii2 helper anchor code snippet in the existing layout page "backend/web/themes/abcrealestate/views/layouts/main.php" -
<div class="dropdown-list-image mr-3">
<!--<img class="rounded-circle" src="img/undraw_profile_2.svg"
alt="..."> -->
<?= Html::img('@web/themes/abcrealestate/img/undraw_profile_2.svg', ['alt'=>'...', 'class'=>'rounded-circle']);?>
<div class="status-indicator"></div>
</div> --------- ---------- ----------
--------- ---------- ---------- <div class="bg-white py-2 collapse-inner rounded">Click to view the Yii2 backend live Demo
<h6 class="collapse-header">Login Screens:</h6>
<!--<a class="collapse-item" href="#">News</a>-->
<?= Html::a('News', ['site/index'], ['class' => 'collapse-item']) ?>
<div class="collapse-divider"></div>
<h6 class="collapse-header">Other Pages:</h6>
<a class="collapse-item" href="#">Blank Page</a>
</div> --------- ---------- ----------
Username = aashutosh, Password = FAU7h@pkb5jXZaP
Please note - Yii2 default view(site) content will be shown after login. As you know Yii2 provide sample content for site view at the path below -
\backend\web\themes\abcrealestate\views\site\index.php
Below is the screenshot of the backend page after login -

Click to view large size
You can write or copy the template "SB Admin" dashboard content or other content as you wish.
5b. Login Page
We will create the separate assets registration, layout page and login form view page for login page as it has no header or footer design.
5b(i). Assets registration for login page
We will follow the STEP 3 for this that had been used for creating the assets file. Copy the "AbcrealestateAsset.php" content and create a new login assets page "AbcrealestateLoginPageAsset.php" at the path - "\backend\assets\".
Now open the html template for login page(login.html) of the "SB Admin - Free Bootstrap Admin Template". Please go at the header portion of the login.html and copy the css path into the login assets file(AbcrealestateLoginPageAsset.php). Next go at the footer portion of the "login.html" and copy the js path into the login assets file(AbcrealestateLoginPageAsset.php). Below is the code of the "AbcrealestateLoginPageAsset.php" file -
<?php
namespace backend\assets;
use yii\web\AssetBundle;
/**
 * Login page backend application asset bundle.
 */
class AbcrealestateLoginPageAsset extends AssetBundle
{
    public $basePath = '@webroot';
    public $baseUrl = '@web';

    public $css = [
        'themes/abcrealestate/vendor/fontawesome-free/css/all.min.css',
        'themes/abcrealestate/css/sb-admin-2.min.css',
    ];
    public $js = [
        'themes/abcrealestate/vendor/jquery/jquery.min.js',
        'themes/abcrealestate/vendor/bootstrap/js/bootstrap.bundle.min.js',
        'themes/abcrealestate/vendor/jquery-easing/jquery.easing.min.js',
        'themes/abcrealestate/js/sb-admin-2.min.js',
     ];
    public $depends = [
        'yii\web\YiiAsset',
        'yii\bootstrap4\BootstrapAsset',
    ];
}
5b(ii). Defining Layout for login page
Yii2 provides a layout file (blank.php) for login page at the path - \backend\web\themes\abcrealestate\views\layouts\blank.php, you can view the layout assignment code in the actionLogin() function at - \backend\controllers\SiteController.php as screenshot below -
We will import and register the login page assets(css, js) at this layout page (blank.php) using the code below(screenshot also shown) -
use backend\assets\AbcrealestateLoginPageAsset;
use yii\helpers\Html;

AbcrealestateLoginPageAsset::register($this);
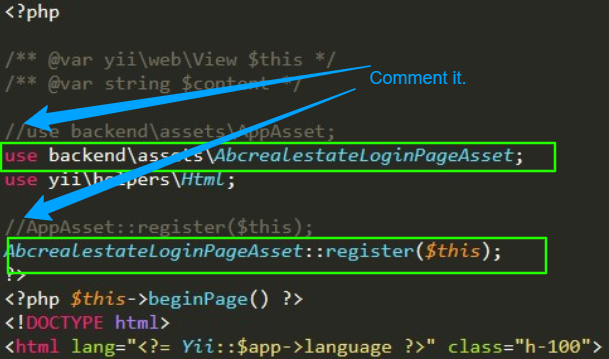
Now open the login template file - "login.html" and copy the whole html code content -"<div class="container">"...</div>" in between <?php $this-">beginBody() ?"> and <?php $this-">endBody() ?">.
Next find the form code "<form class="user">" and replace the Yii2 content variable - <?= $content ?> with this form tag - "<form class="user">....</form>". We will pass the login form code via login view file(\backend\web\themes\abcrealestate\views\site) using the Yii2 content variable - <?= $content ?>.
Below is the login layout file modified code -
<?php
/** @var yii\web\View $this */
/** @var string $content */

//use backend\assets\AppAsset;
use backend\assets\AbcrealestateLoginPageAsset;
use yii\helpers\Html;

//AppAsset::register($this);
AbcrealestateLoginPageAsset::register($this);
?>
<?php $this->beginPage() ?>
<!DOCTYPE html>
<html lang="<?= Yii::$app->language ?>" class="h-100">
<head>
<meta charset="<?= Yii::$app->charset ?>">
<meta name="viewport" content="width=device-width, initial-scale=1, shrink-to-fit=no">
<?php $this->registerCsrfMetaTags() ?>
<title><?= Html::encode($this->title) ?></title>
<?php $this->head() ?>
</head>
<body class="bg-gradient-primary">
<?php $this->beginBody() ?>
<div class="container">
<!-- Outer Row -->
<div class="row justify-content-center">
<div class="col-xl-10 col-lg-12 col-md-9">
<div class="card o-hidden border-0 shadow-lg my-5">
<div class="card-body p-0">
<!-- Nested Row within Card Body -->
<div class="row">
<div class="col-lg-6 d-none d-lg-block bg-login-image"></div>
<div class="col-lg-6">
<div class="p-5">
<div class="text-center">
<h1 class="h4 text-gray-900 mb-4">Welcome Back!</h1>
</div>
<?= $content ?>
</div>
</div>
</div>
</div>
</div>
</div>
</div>
</div>
<?php $this->endBody() ?>
</body>
</html>
<?php $this->endPage();
5b(iii). Writing the form for login page using login page view file
Open the login.html template file then copy and paste the html form code "<form class="user">....</form>" in the login view file at the path - \backend\web\themes\abcrealestate\views\site\login.php.Now replace the every element(form tag, username input field, password input field etc. of the form with Yii2 HTML helpers code as below code. Please note - we have commented the HTML form element and then write Yii2 HTML helper code for troubleshooting purpose. You can delete those commented form HTML element(eg. form tag, username input filed etc.) -
<?phpClick to view the Yii2 login page live demo
/** @var yii\web\View $this */
/** @var yii\bootstrap4\ActiveForm $form */
/** @var \common\models\LoginForm $model */
use yii\bootstrap4\ActiveForm;
use yii\bootstrap4\Html;
$this->title = 'Login';
?>
<!--<form class="user"> -->
<?php $form = ActiveForm::begin(['id' => 'login-form', 'options'=> ['class' => 'user'],]); ?>
<!-- <div class="form-group">
<input type="email" class="form-control form-control-user"
id="exampleInputEmail" aria-describedby="emailHelp"
placeholder="Enter Email Address...">
</div> -->
<?= $form->field($model, 'username')->textInput(['autofocus' => true, 'class' => 'form-control form-control-user', 'placeholder' => "Enter Email Address..."])->label(false); ?>
<!-- <div class="form-group">
<input type="password" class="form-control form-control-user"
id="exampleInputPassword" placeholder="Password">
</div> -->
<?= $form->field($model, 'password')->passwordInput(['class' => 'form-control form-control-user', 'placeholder' => "Password"])->label(false); ?>
<!-- <div class="form-group">
<div class="custom-control custom-checkbox small">
<input type="checkbox" class="custom-control-input" id="customCheck">
<label class="custom-control-label" for="customCheck">Remember
Me</label>
</div>
</div> -->
<?= $form->field($model, 'rememberMe')->checkbox(); ?>
<!-- <a href="index.html" class="btn btn-primary btn-user btn-block">
Login
</a> -->
<?= Html::submitButton('Login', ['class' => 'btn btn-primary btn-user btn-block', 'name' => 'login-button']) ?> <hr>
<a href="#" class="btn btn-google btn-user btn-block">
<i class="fab fa-google fa-fw"></i> Login with Google
</a>
<a href="#" class="btn btn-facebook btn-user btn-block">
<i class="fab fa-facebook-f fa-fw"></i> Login with Facebook
</a>
<?php ActiveForm::end(); ?>
<hr>
<div class="text-center">
<a class="small" href="#">Forgot Password?</a>
</div>
<div class="text-center">
<a class="small" href="#">Create an Account!</a>
</div>
Below is the screenshot of the login page -

Click to view large size
You can also check the interviews questions and answers for Yii 2.0 at Interviews Questions and Answers to get your dream job.
Best Books for Web Development in PHP
1
Programming PHP : Creating Dynamic Web Pages

Book Description
It's the new and updated version of this book - Fourth Edition - that teaches you everything you need to know to build effective web applications using the latest features in PHP 7.4.
The book explains language syntax, programming techniques, and other details using examples that illustrate both correct usage and common idioms.
For those with a working knowledge of HTML, the book contains many style tips and practical programming advice in a clear and concise manner to help you become a top PHP programmer.
The book teaches about fundamentals of the language including data types, variables, operators and flow control statements. It explores about functions, strings, arrays and objects.
It teaches to apply common web application techniques, such as form processing, data validation, session tracking, and cookies.
It teaches to interact with relational databases such as MySQL or NoSQL databases such as MongoDB. It also teaches to generate dynamic images, creating PDF files, and parsing XML files.
You can learn about secure scripts, error handling, performance tuning and other advanced topics in this book.
You can get a quick reference to PHP core functions and standard extensions in this book.
Book details
Format: Kindle Edition, PaperbackRating: 4.6 out of 5
Author: Kevin Tatroe, Peter Macintyre
Print Length: 540 pages
Publication Date: 27 March 2020
Publisher: O′Reilly, 4th edition
Kindle Price: Rs. 1,567.50*
Paperback Price: Rs. 3,614.00*
*Price and stock are correct and available at the time of article publication.
Get it here from Amazon
2
PHP Web Development with Laminas

Book Description
This book teaches how to build fully secure and functional e-commerce applications with PHP using the next generation Zend Framework-Laminas. You can learn to develop modern object-oriented applications with PHP by using Test-Driven Development (TDD) and Behavior-Driven Development (BDD) aided by mature reusable components.
This book provides a practical approach to equip you with the knowledge of the Laminas framework needed to start building web applications based on reuse of loosely coupled components.
You will learn how to build the basic structure of a PHP web application divided into layers. You can understand the MVC components of Laminas and be able to take advantage of the Eclipse platform as a method to develop with Laminas.
Books teach to explore how object-relational mapping is implemented with Laminas-DB, behavior-driven development concepts to sharpen your skills, how to build complete models and reusable components, practice testing How to Create HTML Forms With Laminas-Forms.
By the end of this web development book, you will be able to build completely secure MVC applications in PHP language using Laminas.
Book details
Format: Kindle EditionAuthor: Flávio Gomes da Silva Lisboa
Text-to-Speech: Enabled
Enhanced typesetting: Not Enabled
X-Ray: Not Enabled
Word Wise: Not Enabled
Publication Date: 9 December 2022
Publisher: Packt Publishing
Kindle Price: Rs. 750.74*
*Price and stock are correct and available at the time of article publication.
Get it here from Amazon
3
Getting started with Laravel 9, master the most popular PHP framework

Book Description
This book is for all those who want to build their first application in Laravel 9. This book provides a step-by-step introduction to the writing framework, gets to know its most relevant aspects and focuses above all on practice.
Using this book you will be able to build any basic application with the framework. There are total 19 chapters in this book. Using this book, you will be able to know what are the required software to install Laravel for different operating systems.
In this book you can learn - project creation, database configuration, routing, view controllers, redirection, directive and templating engines in the form of blades, model building, CRUD applications etc.
You can learn to perform common eloquent operations that can be applied to databases using query builders. You can learn how to generate test data using classes.
You can also learn the file upload process. You can learn how to use REST APIs through CRUD type applications in VU3 using Axios requests and web components with Oruga UI.
You can also learn how to configure Browsersync with Laravel to automatically reload applications. You can learn how to protect an app in Vue with the login required to access its various modules using SPA authentication or Laravel Sanctum tokens.
Book details
Format: Kindle EditionRating: 1 out of 5
Author: Andrés Cruz Yoris
Print Length: 453 pages
Publication Date: 8 May 2022
Text-to-Speech: Enabled
Screen Reader: Supported
Enhanced typesetting: Enabled
X-Ray: Not Enabled
Word Wise: Not Enabled
Kindle Price: Rs. 449.00*
*Price and stock are correct and available at the time of article publication.
Get it here from Amazon
4
Learning Drupal as a framework: Your guide to custom Drupal 9. Full code included

Book Description
This book uses PHP> 7.4. This course teaches you about the advanced concepts of Drupal 9, object-oriented PHP and Symfony components.
After the course, you will be able to build a variety of robust and scalable software solutions.
This book discusses advanced topics such as custom entities, entity forms, access controls, events, caching, workflows, and more when building real software.
It gives you powerful and ready-to-use snippets for your next Drupal project with +2400 lines of custom code.
Book details
Format: Kindle EditionRating: 5 out of 5
Author: Stef Van Looveren
Print Length: 282 pages
Publication Date: 17 July 2022
Text-to-Speech: Enabled
Screen Reader: Supported
Enhanced typesetting: Enabled
X-Ray: Not Enabled
Word Wise: Not Enabled
Kindle Price: Rs. 449.00*
*Price and stock are correct and available at the time of article publication.
Get it here from Amazon
5
Getting started with CodeIgniter 4

Book Description
This book is for anyone who wants to build their first applications in CodeIgniter 4 a popular PHP framework, this writing offers a step-by-step introduction to the framework, knowing the most relevant aspects of it, and is focused above all on practice.
The book is aimed at those people who want to learn something new, learn about a framework that has very little documentation, who want to improve a skill in web development, who want to grow as a developer, and who want to continue scaling their path with other frameworks superior to this one.
This book has a total of 15 chapters and consists of explanations and practices. It teaches you how to run the framework, how to configure a database, how to create the first components, how to use of migrations for table management, working with the MVC, how to prepare CRUD application, how to use the routes, grouped routes, their options, and the different types.
You can learn about the use of the session and also of the flash session to save data and present it to the user. You can learn to manage views in a reusable way. You can learn about how to work with HTML forms and apply validations from the server side in CodeIgniter. You can learn about the authentication module with the login interface, and how to build a Rest Api type CRUD that can be consumed with JSON or XML.
You can also learn about generating test data with seeders, how to handle the relational schema of the database, how to do uploading files in the application, how to use libraries and help functions, how to integrate the PayPal platform, etc.
Book details
Format: Kindle EditionAuthor: Andres Cruz
Print Length: 328 pages
Publication Date: 13 May 2022
Text-to-Speech: Enabled
Screen Reader: Supported
Enhanced typesetting: Enabled
X-Ray: Not Enabled
Word Wise: Not Enabled
Kindle Price: Rs. 319.00*
*Price and stock are correct and available at the time of article publication.
Get it here from Amazon


nice
ReplyDelete